Setup Guide: Reading Data from More Than 3 Electricity Meters
Step 1: Enable Software Serial Function
In order to read more than 3 electricity meters, we must first activate the software serial function. This is not yet activated in the firmware, which is installed by default on the WiFi power reader. That's why we first install a suitable firmware.
Step 2: Download the Correct Firmware
The special multi-meter firmware is in preparation. Please contact support at energieleser.de for more information.
Step 3: Install the Firmware via Tasmota Web Installer
-
Go to the Tasmota Web Installer.
-
Click “Upload” and select the firmware file you downloaded.
-
Connect your WiFi Power Reader to your laptop using a USB cable.
-
Click “Connect” and choose the correct COM port.
-
Enable the option “Erase device” to remove old data.
-
Click “Install” and wait for the installation to finish.
Do Not DisconnectDo not disconnect the device during installation.
-
Once done, the Power Reader will automatically reboot.
Step 4: Configure the Script for Multiple Meters
After the firmware installation, you can set up the following sample script for reading from 4 Stromleser TTL sensors + 1 WiFi Power Reader.
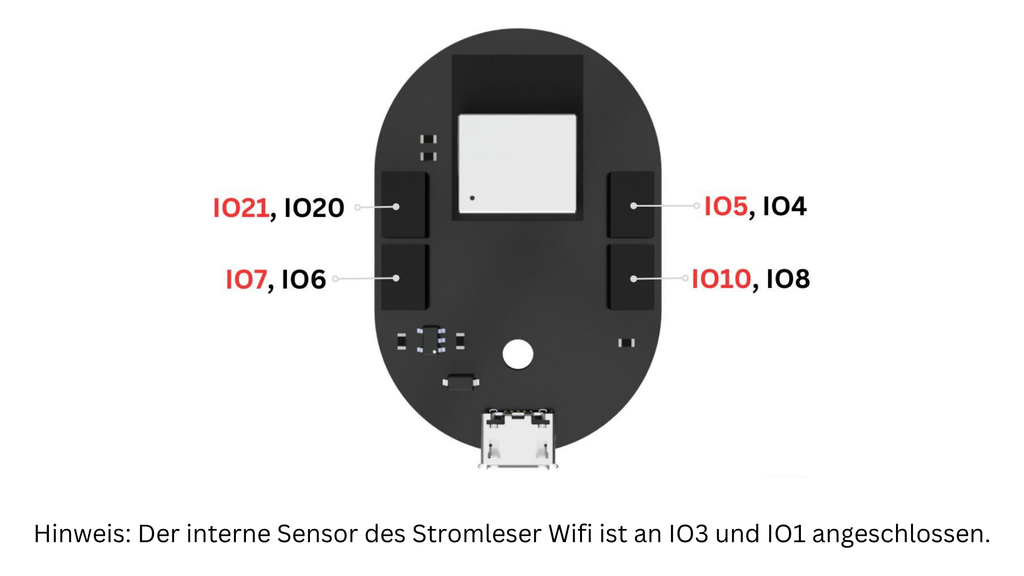
- Stromleser WIFI → Internal port (
IO1), which is used for the main meter connection. - TTL1 → Top right port (
IO4), which handles the second meter. - TTL2 → Bottom right port (
IO8), which handles the third meter. - TTL3 → Top left port (
IO20), which handles the fourth meter. - TTL4 → Bottom left port (
IO6), which handles the fifth meter.
Sample Script (4TTL + 1 Power Reader WiFi)
>D
>B
->sensor53 r
>M 5
+1,3,s,16,9600,MT1,1
+2,10,s,16,9600,MT3,8
+3,-5,s,16,9600,MT2,4
+4,-21,s,16,9600,MT4,20
+5,-7,s,16,9600,MT5,6


1,77070100010800ff@1000,Verbrauch,kWh,E_in,3
1,77070100020800ff@1000,Einspeisung,kWh,E_out,3
1,77070100100700ff@1,akt. Leistung,W,Power,0
1,77070100000009ff@#,Server_ID,,Server_ID,0

2,=h--
2,77070100010800ff@1000,Verbrauch,kWh,E_in,3
2,77070100020800ff@1000,Einspeisung,kWh,E_out,3
2,77070100100700ff@1,akt. Leistung,W,Power,0
2,77070100000009ff@#,Server_ID,,Server_ID,0

3,=h--
3,77070100010800ff@1000,Verbrauch,kWh,E_in,3
3,77070100020800ff@1000,Einspeisung,kWh,E_out,3
3,77070100100700ff@1,akt. Leistung,W,Power,0
3,77070100000009ff@#,Server_ID,,Server_ID,0

4,=h--
4,77070100010800ff@1000,Verbrauch,kWh,E_in,3
4,77070100020800ff@1000,Einspeisung,kWh,E_out,3
4,77070100100700ff@1,akt. Leistung,W,Power,0
4,77070100000009ff@#,Server_ID,,Server_ID,0

5,=h--
5,77070100010800ff@1000,Verbrauch,kWh,E_in,3
5,77070100020800ff@1000,Einspeisung,kWh,E_out,3
5,77070100100700ff@1,akt. Leistung,W,Power,0
5,77070100000009ff@#,Server_ID,,Server_ID,0
#
Step 5: Verify Setup
- Restart the WiFi Power Reader.
- Open the Tasmota console to check if all meters (MT1–MT5) are being detected.
- You should see live data such as:
- Energy consumption (Verbrauch)
- Feed-in (Einspeisung)
- Current power (akt. Leistung)
